Free Woodworking Projects for Easy DIY Furniture Builds

Unleash Your Inner Craftsperson: Simple Woodworking Projects for Stunning DIY Furniture

Tired of mass-produced furniture? Yearning to create something beautiful and functional with your own two hands? Then dive into the rewarding world of woodworking! This article presents several easy DIY furniture projects perfect for beginners, requiring minimal tools and experience. Prepare to transform basic lumber into stylish pieces that will enhance your home and boost your confidence. Forget expensive, impersonal store-bought pieces; let's build something truly unique and personal.

A Rustic Charm: The Simple Bookshelf

Start your woodworking journey with a project that's both practical and aesthetically pleasing: a rustic bookshelf. This project utilizes basic cuts and requires minimal joinery, making it ideal for novices. You'll primarily need untreated pine boards, wood glue, screws, and a simple saw (a circular saw or hand saw will work fine). Choose attractive, slightly uneven boards for a more rustic feel. Remember to sand all surfaces smooth before assembling. Consider adding a protective stain or sealant to enhance the wood's natural beauty and durability. The entire process, from cutting to finishing, can be completed within a weekend, leaving you with a charming bookshelf ready to showcase your favorite reads.

Step-by-Step Guide:

  1. Cut the boards to your desired dimensions for shelves and sides. Remember to account for the thickness of the boards when determining shelf spacing.
  2. Apply wood glue to the ends of the shelf boards and attach them to the side pieces using screws, ensuring even spacing.
  3. Sand all surfaces thoroughly, paying attention to any rough edges or splinters.
  4. Apply a stain or sealant of your choice. Allow sufficient drying time before use.

Modern Minimalism: A Sleek Floating Shelf

For a more contemporary touch, create a sleek floating shelf. This project showcases clean lines and minimal hardware. You'll need high-quality plywood, strong wood screws, and sturdy L-brackets hidden behind the shelf. Precise measurements are crucial for this project to maintain its modern aesthetic. Before installation, carefully plan the placement to ensure it's securely mounted to a wall stud. Once installed, the floating shelf will appear to effortlessly float against your wall, providing a sophisticated storage solution.

Essential Tips:

  • Use a level to ensure the shelf is perfectly horizontal.
  • Pre-drill pilot holes to prevent splitting the wood when screwing in the brackets.
  • Consider adding a subtle edge banding to the shelf's front for a polished finish.

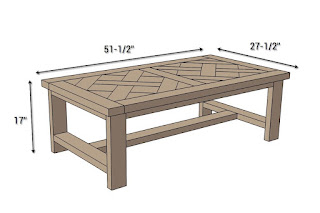
Rustic Industrial Style: A Simple Coffee Table

Embrace the industrial aesthetic with a simple coffee table built from reclaimed wood or repurposed pallets. This project involves slightly more complex joinery, but it remains achievable for beginners. Safety is paramount – always wear safety glasses and use appropriate tools. You'll need to carefully disassemble the pallet (if using one) and thoroughly clean the wood. Consider using metal hairpin legs for a distinctly industrial touch. Once assembled, the rustic coffee table will add a unique, character-filled centerpiece to your living room.

Choosing Your Materials:

  • If using pallets, ensure they are properly treated and free from harmful chemicals or pests.
  • Sand the wood thoroughly to remove any splinters or uneven surfaces.
  • Use strong wood glue and screws to create a robust and stable table.

These are just three starting points. With a little creativity and some basic woodworking skills, you can transform simple materials into stunning, personalized furniture. So, gather your tools, choose your project, and unleash your inner craftsman!

Share:

Smart Woodworking Plans for Tool Storage Solutions

Smart Woodworking Plans for Tool Storage Solutions

Tired of cluttered workshops and endlessly searching for that one specific tool? Effective tool storage isn't just about tidiness; it's about boosting your efficiency and safety. This article provides smart woodworking plans to transform your workspace from chaotic to organized, empowering you to reclaim your workshop and maximize your productivity. We'll explore various designs, from simple to complex, ensuring you find the perfect solution for your needs and skill level. Get ready to build the ultimate tool storage system!

Wall-Mounted Tool Storage: Maximizing Vertical Space

Wall-mounted storage offers a fantastic way to reclaim valuable floor space in your workshop. Instead of tools cluttering benches and floors, they'll be readily accessible and neatly organized. Consider these options:

French Cleat System: The Versatile Choice

A French cleat system provides unparalleled flexibility and adaptability. This ingenious system utilizes angled cleats mounted to both the wall and the backs of your tool organizers. The angled design allows for easy insertion and removal of tools and storage units. Build your cleats from sturdy hardwood like maple or oak for long-lasting durability. You can customize the size and number of cleats to perfectly fit your workshop's dimensions and tool collection. This system allows for easy rearrangement and addition of new storage components as your needs evolve.

Floating Shelves with Tool Racks: A Classic Approach

Simple floating shelves are a classic and effective solution. Enhance them by adding integrated tool racks or hooks beneath the shelves. This design keeps tools organized and within easy reach. Choose shelves made from thick, robust lumber to prevent sagging under the weight of heavier tools. Consider adding a finish, such as a durable varnish or polyurethane, to protect the wood from moisture and wear.

Mobile Tool Cabinets: Portability and Organization

For larger workshops or those who frequently move tools between work areas, mobile tool cabinets offer both organization and portability. These cabinets provide a secure and organized solution for storing hand tools, power tools, and other workshop essentials.

Rolling Cabinet with Drawers and Shelves: A Customizable Solution

Design a rolling cabinet with a combination of drawers and shelves to accommodate different types of tools. Use high-quality drawer slides for smooth operation and durability. Shelves offer versatile storage for larger items, while drawers provide a safe place for smaller tools and accessories. Remember to incorporate sturdy casters to ensure easy mobility.

Specialized Tool Carriers: Tailored to Your Needs

For specific tool sets, consider building dedicated carriers. A router table carrier, for instance, can hold your router, bits, and other accessories neatly together. This prevents the frustration of searching for individual components. Design these carriers with handles for easy transportation.

Advanced Tool Storage: Beyond the Basics

For serious woodworkers, advanced storage solutions offer maximum organization and efficiency. These designs often require more advanced woodworking skills but provide significant rewards.

Outfeed Table with Built-in Storage: Efficiency and Safety

Combine an outfeed table with integrated storage for tools and materials used during specific woodworking projects. This consolidates related equipment, increasing your workflow efficiency and reducing setup time. Incorporate safety features such as a dust collection system to maintain a clean work environment.

Customizable Pegboard System: Ultimate Flexibility

A well-designed pegboard system offers the ultimate in flexibility and customization. You can adapt it to hold any type of tool, simply by choosing the appropriate pegs and hooks. Choose a durable pegboard material that can withstand daily use. Consider painting the pegboard for a more finished look.

By implementing these smart woodworking plans, you transform your workshop from a frustrating space into a highly efficient and enjoyable workspace. Remember to prioritize safety, durability, and ease of use when designing and constructing your tool storage solutions. Happy building!

Share:

Best Portable Woodworking Tables for Small Workshops

Best Portable Woodworking Tables for Small Workshops

Cramped quarters shouldn't cramp your woodworking style! A small workshop doesn't mean sacrificing functionality. The key is choosing the right portable workbench. This article explores the best portable woodworking tables designed for maximizing space and minimizing compromise in small workshops, focusing on features that matter most to serious woodworkers working with limited space.

Key Features to Consider

Before diving into specific models, let's pinpoint the essential features to look for in a portable woodworking table tailored for small spaces. Consider these factors carefully to find the perfect fit for your needs and available footprint. A seemingly minor detail can significantly impact your workflow and overall satisfaction. Don't underestimate the importance of thoughtful selection!

Size and Portability

Obviously, size reigns supreme in a small workshop. Measure your available space meticulously before purchasing. Look for tables that fold flat for easy storage, feature lightweight yet durable construction (often employing aluminum or high-quality folding mechanisms), and boast manageable weight for easy transport. Some even offer wheels for effortless mobility between work areas. Remember, "portable" means more than just small – it means easily moved and stored when not in use.

Work Surface Area and Stability

While compactness is key, you still need adequate working space. A smaller footprint doesn't necessarily mean a cramped working surface. Some cleverly designed tables maximize usable area. Look for sturdy construction with robust legs and bracing to prevent wobbling, especially when using power tools. A stable work surface ensures accuracy and safety – crucial elements in any woodworking project.

Durability and Material

Invest in a portable workbench built to withstand the rigors of woodworking. Choose materials that resist dents, scratches, and the usual wear and tear of projects involving heavy tools. Consider work surfaces made from durable materials like plywood, MDF, or even high-pressure laminate (HPL). Sturdy metal legs or frames are essential for providing a rock-solid platform.

Additional Features

Consider features that enhance functionality and convenience. These can include:

  • Integrated clamping systems
  • Built-in storage for tools and supplies
  • Adjustable height options
  • Pre-drilled holes for vises or other accessories
These extras can significantly boost efficiency and organization within a limited space.

Top Picks for Small Workshops

Now, let's explore some excellent portable woodworking tables ideal for small workshops. We've selected models based on the aforementioned criteria, highlighting what sets each one apart.

[Insert Model Name and Manufacturer Here]

Highlight key features: Size, weight, material, unique selling points, and price point. Mention any pros and cons. For example, "The [Model Name] boasts a surprisingly spacious work surface despite its compact folded size. Its lightweight aluminum frame makes moving it a breeze, while the durable HPL top resists scratches. However, the integrated clamps might feel a little weak for very large projects."

[Insert Model Name and Manufacturer Here]

Highlight key features: Size, weight, material, unique selling points, and price point. Mention any pros and cons. For example, "The [Model Name] is a budget-friendly option that doesn't compromise on sturdiness. Its folding design and robust steel legs make it perfect for small spaces. However, the lack of integrated storage might require you to supplement with additional storage solutions."

[Insert Model Name and Manufacturer Here]

Highlight key features: Size, weight, material, unique selling points, and price point. Mention any pros and cons. For example, "The [Model Name] excels in versatility. Its adjustable height and multiple configurations make it adaptable for various tasks, even outside the workshop. However, this versatility comes at the cost of slightly higher price and perhaps more complex assembly."

Conclusion

Choosing the right portable woodworking table can transform your small workshop from a cramped space into an efficient and enjoyable workspace. By carefully considering size, stability, durability, and additional features, you can find the perfect solution to maximize your space and minimize frustration. Remember to always prioritize safety and invest in a quality table that will last for years of woodworking projects.

Share:

Top Materials for Coffee Tables – Wood, Glass, or Metal?

Top Materials for Coffee Tables – Wood, Glass, or Metal?

Choosing the perfect coffee table can feel overwhelming! There are so many styles, sizes, and materials to consider. But one of the biggest decisions you'll face is the material. Wood, glass, and metal are all popular choices, each with its own unique pros and cons. So, let's dive in and explore which might be the best fit for your home and lifestyle.

Wood: The Classic Choice

Wood coffee tables have been a staple in living rooms for generations, and for good reason. They offer a timeless elegance that's hard to beat. The natural warmth and beauty of wood bring a cozy and inviting feel to any space. But not all wood is created equal! You'll find a huge range of options, from richly hued hardwoods to more affordable softwoods.

Types of Wood & Their Characteristics:

Choosing the right type of wood depends on your budget and desired aesthetic. Here are a few popular options:

  • Oak: Durable, strong, and available in a variety of grains and colors. It's a classic choice that ages beautifully.
  • Walnut: Known for its rich, dark brown color and stunning grain patterns. It's a luxurious choice, but typically more expensive.
  • Maple: A lighter-colored wood with a smooth, fine grain. It's quite durable and versatile, working well in both modern and traditional settings.
  • Pine: A more affordable softwood option, pine is known for its knots and variations in color. It's less durable than hardwoods but can be easily stained or painted.
  • Mango Wood: A sustainable and increasingly popular choice, mango wood offers a rich, varied grain and warm tones. It's often more affordable than other hardwoods.

Pros of Wood Coffee Tables:

  • Aesthetically pleasing: Wood offers natural beauty and warmth.
  • Durable: Hardwoods, in particular, are very resilient and can last for many years.
  • Versatile: Wood complements a wide range of décor styles.
  • Can be refinished: Scratches and minor damage can often be repaired or sanded down.

Cons of Wood Coffee Tables:

  • Can be expensive: High-quality hardwoods can be costly.
  • Susceptible to damage: Water rings, scratches, and dents are possible.
  • Requires maintenance: Regular cleaning and occasional polishing are needed to maintain its appearance.
  • Heavier than other materials: Moving and rearranging can be more challenging.

Glass: Modern and Chic

Glass coffee tables bring a sense of modernity and sophistication to a room. They offer a clean, minimalist look that's perfect for contemporary or transitional spaces. But just like with wood, there's variety in glass coffee tables too. You'll find them in different thicknesses, colors (like tinted or frosted glass), and with various base materials.

Types of Glass & Considerations:

The type of glass can impact the table's overall look and durability:

  • Tempered Glass: Much stronger and safer than regular glass. This is the most common type used in coffee tables.
  • Frosted Glass: Offers a more opaque and diffused look, softening the overall aesthetic.
  • Tinted Glass: Adds a touch of color, creating a more dramatic effect.

Pros of Glass Coffee Tables:

  • Modern and sleek appearance: A stylish choice for contemporary homes.
  • Easy to clean: A quick wipe is usually all it takes.
  • Allows light to pass through: Can make a room feel brighter and more spacious.
  • Visually lightweight: Doesn't overwhelm a room.

Cons of Glass Coffee Tables:

  • Can be fragile: Prone to cracking or shattering if dropped or bumped.
  • Shows fingerprints and smudges easily: Requires frequent cleaning.
  • Can be cold to the touch: Not as inviting as warmer materials like wood.
  • Not ideal for homes with children or pets: Higher risk of breakage.

Metal: Industrial Strength & Style

Metal coffee tables offer a distinctly industrial or modern aesthetic. They're often chosen for their durability and clean lines. From sleek chrome to rustic wrought iron, the options are diverse and can suit various styles.

Types of Metal & Finishes:

The metal type significantly affects both the look and feel of your coffee table:

  • Steel: Strong and durable, often used in industrial-style designs. Can be finished in various ways, from powder coating to chrome plating.
  • Iron: A heavier metal that can be forged into intricate designs. Often has a more rustic or antique look.
  • Aluminum: Lightweight and corrosion-resistant, making it a good option for outdoor use.
  • Brass or Copper: Adds a touch of luxury and warmth, creating a more vintage or glam look.

Pros of Metal Coffee Tables:

  • Extremely durable: Can withstand significant wear and tear.
  • Easy to clean: Wipe down with a damp cloth.
  • Versatile in style: Can suit modern, industrial, or even vintage settings.
  • Often lightweight (aluminum): Easier to move than wood tables.

Cons of Metal Coffee Tables:

  • Can be cold to the touch: May not be as comfortable as wood.
  • Can scratch easily (some metals): Requires care to prevent damage to the finish.
  • Prone to rust (unless treated): Requires proper maintenance, especially for outdoor use.
  • Can be expensive (depending on metal and finish): Some high-end metal tables can be quite pricey.

The Verdict? It Depends!

Ultimately, the best material for your coffee table depends entirely on your personal preferences, your home's style, and your lifestyle. Consider your budget, the overall look you're aiming for, and how much maintenance you're willing to commit to.

Commonly Asked Questions

  • Q: Are glass coffee tables safe for families with young children? A: While tempered glass is strong, it can still break. Consider the risks before choosing a glass coffee table for a home with young children or pets.
  • Q: How do I clean a wood coffee table? A: Use a soft, damp cloth and mild wood cleaner. Avoid harsh chemicals and abrasive cleaners.
  • Q: Which metal is best for outdoor coffee tables? A: Aluminum is a great choice for its corrosion resistance. Powder-coated steel is also a good option.
  • Q: Can I refinish a wood coffee table myself? A: Yes, but it requires some skill and the right tools. Consider hiring a professional for complex repairs or refinishing.
  • Q: What's the difference between tempered and regular glass? A: Tempered glass is heat-treated, making it significantly stronger and safer than regular glass. It's much more resistant to breakage.
Share:

How to Choose the Perfect Coffee Table for Your Space

Unlocking Coffee Table Chic: The Ultimate Guide to Choosing the Perfect Piece

The coffee table. Often overlooked, yet undeniably the heart of your living room. It's the central stage for gatherings, a resting place for your favorite book, and a silent testament to your personal style. Choosing the right one can transform your space, elevating it from ordinary to extraordinary. This guide will walk you through the key considerations, ensuring you select a coffee table that's not only aesthetically pleasing but also perfectly functional for your lifestyle.

Measuring Your Space: First Steps to Success

Before you even begin browsing the endless array of coffee tables, grab your measuring tape! Carefully measure the dimensions of your living room, paying close attention to the distance between your sofa and any other furniture. You need sufficient space for comfortable movement around the coffee table. Avoid overcrowding; leave enough room to easily navigate the space. Consider the size of your sofa – a petite sofa paired with a massive coffee table will look disproportionate and feel cramped. A large sectional, however, demands a substantial coffee table to anchor the space. The rule of thumb? The coffee table should be roughly two-thirds to three-quarters the length of your sofa.

Beyond Length: Height Matters Too

The height of your coffee table is equally crucial. It should complement your sofa's height, allowing for comfortable armrest placement and easy access to drinks and snacks. Ideally, the top of the coffee table should sit roughly the same height as the seat cushions of your sofa, or slightly lower, creating a seamless flow and avoiding awkwardly high or low surfaces. Don't forget to consider the height of any nearby armchairs or accent seating for consistent visual harmony.

Style and Function: Finding the Perfect Blend

Your coffee table is more than just a piece of furniture; it's a reflection of your personal style. Do you gravitate towards sleek, modern lines or the rustic charm of reclaimed wood? Do you prefer a minimalist aesthetic or a more eclectic approach? Explore different materials like wood, glass, metal, or stone, considering their durability, maintenance requirements, and overall aesthetic contribution to your living room's design.

Considering Your Lifestyle: Practicality Plays a Role

Think about your lifestyle and how you'll actually use the coffee table. Do you entertain frequently? A large, sturdy coffee table with ample surface area might be ideal. Do you prefer a clean, uncluttered look? A smaller, more minimalist table might be a better choice. Families with children might benefit from a durable, easy-to-clean surface, possibly opting for materials like laminate or sealed wood. Consider storage solutions too; many coffee tables offer drawers, shelves, or hidden compartments for keeping remotes, magazines, and games organized.

Choosing the Right Material: Durability and Aesthetics

The material you choose significantly impacts both the look and longevity of your coffee table. Wood offers timeless appeal and warmth, but requires regular maintenance. Glass provides a sleek, modern look but is susceptible to scratches and fingerprints. Metal offers a durable and industrial aesthetic, while stone exudes luxury and sophistication. Consider your budget and maintenance preferences when making your selection. Explore different finishes, such as painted, stained, or polished, to further customize the look and feel of your coffee table.

Beyond the Basics: Adding Personality

Once you've narrowed down your options based on size, style, and material, it's time to inject your personality. Consider adding decorative elements such as trays, bowls, or sculptures to personalize your coffee table. Introduce pops of color through cushions, throws, or books to create a visually engaging space. The final touch is arranging items thoughtfully; avoid overcrowding, instead opting for a curated selection that reflects your tastes and enhances the overall aesthetic of your living room.

Finding the perfect coffee table is an exciting process. By carefully considering the factors outlined above, you can confidently choose a piece that not only complements your living space but enhances it, creating a comfortable, stylish, and functional heart of your home.

Share:

Pallet Woodworking Plans – Free PDF Download

Unlock Your Creativity: Free Pallet Woodworking Plans PDF Download

Tired of staring at those discarded pallets gathering dust? Transform that overlooked lumber into stunning, functional pieces with our free downloadable pallet woodworking plans! This guide unlocks a world of possibilities, offering detailed instructions and inspiring designs for projects ranging from rustic furniture to charming home décor. Whether you're a seasoned woodworker or a complete beginner, these plans provide clear, step-by-step guidance, empowering you to create beautiful, unique items for your home and beyond. Forget expensive lumber – discover the potential hidden within readily available pallets and unleash your inner artisan.

Why Choose Pallet Woodworking?

Pallet woodworking offers a compelling blend of sustainability, affordability, and creative freedom. Repurposing pallets reduces waste and contributes to a greener lifestyle. The inherent character of reclaimed wood, with its varied textures and natural imperfections, adds a rustic charm unmatched by mass-produced materials. And perhaps best of all, the cost is significantly lower than buying new lumber, making it a perfect option for budget-conscious DIY enthusiasts. This means you can create beautiful, unique pieces without breaking the bank, allowing you to invest more in your creativity and less in materials.

What You'll Find in Our Free PDF Download

Our comprehensive PDF download contains a curated collection of meticulously designed pallet woodworking plans. We've categorized the plans for easy navigation, ensuring you can quickly find the perfect project for your skill level and desired outcome. Each plan includes detailed diagrams, precise measurements, a comprehensive materials list, and step-by-step instructions accompanied by clear, high-quality images. We believe in making the process as straightforward as possible, so whether you're tackling a simple shelf or a more complex coffee table, you'll find the guidance you need to succeed.

Project Examples Included:

  • Rustic Coffee Table: Learn to construct a sturdy and stylish coffee table, showcasing the natural beauty of reclaimed pallet wood.
  • Charming Garden Planters: Transform old pallets into charming planters, adding a touch of rustic elegance to your garden or patio.
  • Functional Wall Shelves: Create versatile wall shelves perfect for showcasing your favorite items or organizing your home.
  • Stylish Headboard: Add a unique and personalized touch to your bedroom with a stunning pallet headboard.
  • Creative Outdoor Seating: Build comfortable and durable outdoor seating options, perfect for relaxing in your backyard.

Beyond the Plans: Safety and Preparation

Before you begin any project, prioritize safety. Always wear appropriate safety gear, including safety glasses and gloves. Ensure the pallets are clean and free of any harmful substances before starting your work. Properly deconstruct the pallets, carefully removing nails and staples to avoid injuries. Remember, careful preparation is key to a successful and safe woodworking experience. The detailed instructions in the PDF also include important safety tips and considerations.

Download Your Free Pallet Woodworking Plans Now!

Ready to transform discarded pallets into stunning creations? Click the link below to download your free PDF containing a wealth of inspiring pallet woodworking plans. Start creating today and unleash your inner craftsman!

[Insert Download Link Here]

Share:

Modern Coffee Table Build – Free PDF Guide

Modern Coffee Table Build – A Comprehensive Guide

This document provides a detailed, step-by-step guide for constructing a modern coffee table. The design emphasizes clean lines, minimalist aesthetics, and the utilization of readily available materials. While some woodworking experience is beneficial, this guide is designed to be accessible to individuals with intermediate skills. Safety precautions are paramount throughout the process; appropriate personal protective equipment (PPE) should be worn at all times.

I. Materials and Tools

Before commencing the project, ensure you have acquired all necessary materials and tools. Accurate measurements and careful selection of materials are crucial to achieve the desired aesthetic and structural integrity. The list below provides a comprehensive inventory; adjustments may be necessary based on individual design preferences and dimensions.

A. Lumber Selection

The choice of lumber significantly impacts the final product's appearance and durability. Hardwoods such as walnut, maple, or oak offer superior strength and visual appeal but come at a higher cost. Softwoods like pine or fir are more affordable but may require additional care to prevent scratches and dents. Consider the desired finish and overall aesthetic when making your selection. Ensure the lumber is properly dried (less than 10% moisture content) to prevent warping and cracking.

Specific Material Requirements (Example):

  • Four pieces of 2" x 4" hardwood (legs) – 24" length
  • One piece of ¾" plywood (top) – 48" x 24"
  • Two pieces of 2" x 2" hardwood (supports) – 44" length
  • Wood screws (various sizes)
  • Wood glue

B. Tool Inventory

A comprehensive set of tools is essential for a successful build. Using appropriate tools not only enhances efficiency but also contributes to a safer working environment. Improper tools can lead to inaccurate cuts, structural weaknesses, and potential injury.

  • Measuring Tape: Essential for accurate measurements of all components.
  • Circular Saw or Miter Saw: For precise cuts of the lumber.
  • Drill with assorted drill bits: For pilot holes and screw insertion.
  • Screwdriver bits (Phillips and flathead): Matching the chosen screws.
  • Clamps: To hold pieces securely during gluing and assembly.
  • Sandpaper (various grits): For smoothing surfaces and preparing for finishing.
  • Safety Glasses: Crucial for protecting eyes from flying debris.
  • Dust Mask: To minimize inhalation of sawdust.
  • Wood Filler: To fill any gaps or imperfections.
  • Finishing supplies (stain, sealant, or paint): To protect and enhance the wood.
  • Level: To ensure the table is perfectly level.

II. Construction Process

The construction process is divided into several distinct stages. Meticulous attention to detail at each stage is crucial for a high-quality finish. Follow the steps carefully, ensuring accuracy and precision in each measurement and cut.

A. Cutting the Lumber

Begin by accurately measuring and cutting all lumber components according to the provided dimensions or your customized design. Ensure the cuts are clean and square. Use a miter saw for precise angled cuts if required by your design. Always utilize proper safety precautions, including the use of safety glasses and a dust mask.

B. Assembling the Legs and Supports

Attach the legs to the support beams using wood glue and screws. Pre-drill pilot holes to prevent the wood from splitting. Ensure the joints are square and secure. Use clamps to hold the pieces in place while the glue dries. Allow sufficient drying time as specified by the wood glue manufacturer before proceeding to the next step.

C. Attaching the Tabletop

Once the leg assembly is complete and the glue is fully cured, attach the plywood tabletop. This can be done using screws or by employing a more advanced joinery technique, such as dadoes and rabbets, for a stronger and more aesthetically pleasing connection. Again, pre-drilling pilot holes is essential to prevent wood splitting.

D. Sanding and Finishing

Once the coffee table is assembled, sand all surfaces thoroughly, starting with coarser grits and progressing to finer grits. This will create a smooth surface for finishing. Apply wood filler to any imperfections or gaps before sanding. After sanding, apply your chosen finish – stain, paint, or sealant – according to the manufacturer's instructions. Allow ample drying time between coats for optimal results.

III. Advanced Techniques (Optional)

For those seeking a more sophisticated coffee table, consider incorporating advanced woodworking techniques. These techniques will significantly enhance the overall quality and aesthetics of your project.

A. Dovetail Joints

Dovetail joints provide exceptional strength and a visually appealing interlocking design. This technique requires advanced woodworking skills and specialized tools but offers superior durability compared to simple butt joints.

B. Mortise and Tenon Joints

Mortise and tenon joints are another strong and visually appealing joinery technique, particularly well-suited for leg-to-support connections. This method requires precise measurements and cuts, ensuring a snug fit for increased stability.

C. Customizable Designs

This guide provides a foundational design. Consider incorporating personal touches by experimenting with different wood types, finishes, and shapes. Incorporating metal accents or adding a drawer for additional storage can further personalize the project.

IV. Safety Precautions

Safety is paramount throughout the entire building process. Always wear appropriate personal protective equipment (PPE), including safety glasses, a dust mask, and hearing protection when using power tools. Work in a well-ventilated area to minimize exposure to sawdust and fumes. Keep your work area clean and organized to prevent accidents. Follow all manufacturer's instructions for tools and finishing products. If unsure about any step, seek guidance from an experienced woodworker before proceeding.

This comprehensive guide provides a detailed blueprint for constructing a modern coffee table. By carefully following these instructions and prioritizing safety, you can create a beautiful and functional piece of furniture that enhances your living space. Remember that patience and attention to detail are key to achieving a successful outcome.

Share: