Modern Coffee Table Build – A Comprehensive Guide
This document provides a detailed, step-by-step guide for constructing a modern coffee table. The design emphasizes clean lines, minimalist aesthetics, and the utilization of readily available materials. While some woodworking experience is beneficial, this guide is designed to be accessible to individuals with intermediate skills. Safety precautions are paramount throughout the process; appropriate personal protective equipment (PPE) should be worn at all times.
I. Materials and Tools
Before commencing the project, ensure you have acquired all necessary materials and tools. Accurate measurements and careful selection of materials are crucial to achieve the desired aesthetic and structural integrity. The list below provides a comprehensive inventory; adjustments may be necessary based on individual design preferences and dimensions.

A. Lumber Selection
The choice of lumber significantly impacts the final product's appearance and durability. Hardwoods such as walnut, maple, or oak offer superior strength and visual appeal but come at a higher cost. Softwoods like pine or fir are more affordable but may require additional care to prevent scratches and dents. Consider the desired finish and overall aesthetic when making your selection. Ensure the lumber is properly dried (less than 10% moisture content) to prevent warping and cracking.
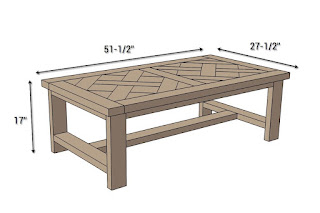
Specific Material Requirements (Example):
- Four pieces of 2" x 4" hardwood (legs) – 24" length
- One piece of ¾" plywood (top) – 48" x 24"
- Two pieces of 2" x 2" hardwood (supports) – 44" length
- Wood screws (various sizes)
- Wood glue
B. Tool Inventory
A comprehensive set of tools is essential for a successful build. Using appropriate tools not only enhances efficiency but also contributes to a safer working environment. Improper tools can lead to inaccurate cuts, structural weaknesses, and potential injury.
- Measuring Tape: Essential for accurate measurements of all components.
- Circular Saw or Miter Saw: For precise cuts of the lumber.
- Drill with assorted drill bits: For pilot holes and screw insertion.
- Screwdriver bits (Phillips and flathead): Matching the chosen screws.
- Clamps: To hold pieces securely during gluing and assembly.
- Sandpaper (various grits): For smoothing surfaces and preparing for finishing.
- Safety Glasses: Crucial for protecting eyes from flying debris.
- Dust Mask: To minimize inhalation of sawdust.
- Wood Filler: To fill any gaps or imperfections.
- Finishing supplies (stain, sealant, or paint): To protect and enhance the wood.
- Level: To ensure the table is perfectly level.
II. Construction Process
The construction process is divided into several distinct stages. Meticulous attention to detail at each stage is crucial for a high-quality finish. Follow the steps carefully, ensuring accuracy and precision in each measurement and cut.
A. Cutting the Lumber
Begin by accurately measuring and cutting all lumber components according to the provided dimensions or your customized design. Ensure the cuts are clean and square. Use a miter saw for precise angled cuts if required by your design. Always utilize proper safety precautions, including the use of safety glasses and a dust mask.
B. Assembling the Legs and Supports
Attach the legs to the support beams using wood glue and screws. Pre-drill pilot holes to prevent the wood from splitting. Ensure the joints are square and secure. Use clamps to hold the pieces in place while the glue dries. Allow sufficient drying time as specified by the wood glue manufacturer before proceeding to the next step.
C. Attaching the Tabletop
Once the leg assembly is complete and the glue is fully cured, attach the plywood tabletop. This can be done using screws or by employing a more advanced joinery technique, such as dadoes and rabbets, for a stronger and more aesthetically pleasing connection. Again, pre-drilling pilot holes is essential to prevent wood splitting.
D. Sanding and Finishing
Once the coffee table is assembled, sand all surfaces thoroughly, starting with coarser grits and progressing to finer grits. This will create a smooth surface for finishing. Apply wood filler to any imperfections or gaps before sanding. After sanding, apply your chosen finish – stain, paint, or sealant – according to the manufacturer's instructions. Allow ample drying time between coats for optimal results.
III. Advanced Techniques (Optional)
For those seeking a more sophisticated coffee table, consider incorporating advanced woodworking techniques. These techniques will significantly enhance the overall quality and aesthetics of your project.
A. Dovetail Joints
Dovetail joints provide exceptional strength and a visually appealing interlocking design. This technique requires advanced woodworking skills and specialized tools but offers superior durability compared to simple butt joints.
B. Mortise and Tenon Joints
Mortise and tenon joints are another strong and visually appealing joinery technique, particularly well-suited for leg-to-support connections. This method requires precise measurements and cuts, ensuring a snug fit for increased stability.
C. Customizable Designs
This guide provides a foundational design. Consider incorporating personal touches by experimenting with different wood types, finishes, and shapes. Incorporating metal accents or adding a drawer for additional storage can further personalize the project.
IV. Safety Precautions
Safety is paramount throughout the entire building process. Always wear appropriate personal protective equipment (PPE), including safety glasses, a dust mask, and hearing protection when using power tools. Work in a well-ventilated area to minimize exposure to sawdust and fumes. Keep your work area clean and organized to prevent accidents. Follow all manufacturer's instructions for tools and finishing products. If unsure about any step, seek guidance from an experienced woodworker before proceeding.
This comprehensive guide provides a detailed blueprint for constructing a modern coffee table. By carefully following these instructions and prioritizing safety, you can create a beautiful and functional piece of furniture that enhances your living space. Remember that patience and attention to detail are key to achieving a successful outcome.


No comments:
Post a Comment